Having a working fireplace in your own home is prestigious, convenient and, in a sense, even romantic. Few people refuse to build it in their country house or in a private suburban household. This article tells how to build a fireplace at home with your own hands.
The construction design is selected depending on what function this object will perform in your home. After all, it can be either an effective structure for heating a home, or just a decorative ornament, creating the illusion of a living hearth.
Varieties of home fireplaces by their location
By the method of their location, fireplaces are divided into several varieties.
Built-in fireplace - a structure made in a niche of a load-bearing wall. This is the only variety that should be created at the stage of construction of the house. It is initially included in the main project of the building, has a powerful chimney, saves the space of the room and guarantees a powerful heat transfer. With the help of such a device, it is possible to heat a room of impressive size in bad weather.

A wall fireplace is the most common type. Its construction is located separately from the wall, and its chimney is attached directly to the wall. It is created after the construction of the house (after its owner wants to feel like an English aristocrat and enjoy the crack of burning logs, sitting in a rocking chair).
A corner fireplace is an object located in the corner of a living room. Its unusual location gives a special charm to the surroundings. This design is quite simple, and its chimney is similar to the chimney used in the composition of wall fireplaces. A chimney is located at one of the load-bearing walls, clinging to it with its rear wall.

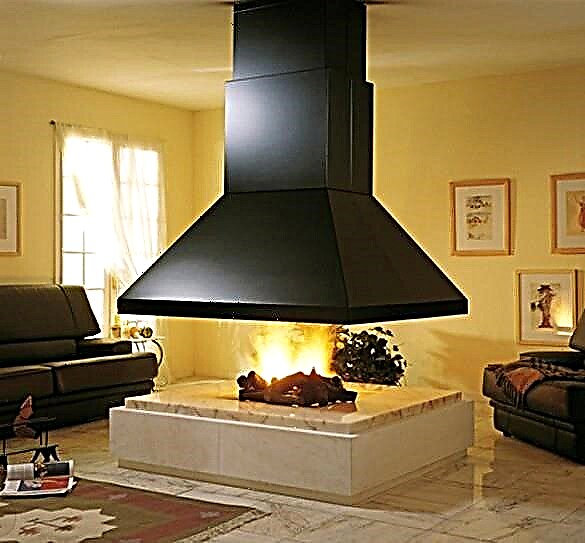
A free-standing fireplace - it is also called central. It is located in the interior of the room, and its chimney is in no way connected with the supporting structures. Such a structure looks very original, and around it several people can comfortably accommodate at once.
The design of all these varieties provides for the arrangement of an open type firebox. Regardless of the location method, all fireplaces have approximately the same layout and have the same elements. Fundamental differences between them can arise only when a water heating circuit or underfloor heating is built into the structure. But this issue requires a separate consideration, because its subject matter is more inclined to the correct arrangement of modern heating systems.
Fireplace foundation
Like any construction, the creation of a fireplace begins with the arrangement of a reliable foundation. When creating it, one should take into account the fact that the fireplace has a rather massive structure and its weight can reach several hundred kilograms.
Depth, dimensions and other features of the foundation depend on the design. The issue is not heating, but the heavy weight of the fireplace with a chimney. Therefore, under the fireplace over 200 kg is poured either the broadening of the tape, or a separate massive foundation at the same depth as the tape.
The foundation is created on the basis of concrete mortar. It can be strengthened by installing a grate of metal fittings in a dug pit. A concrete pillow is created as the base. This is also an acceptable option for the foundation, which is poured in layers. Regardless of the type of foundation, at the bottom of the pit, you should create a sand pillow 5 ... 6 cm thick, on top of which you need to pour a thin layer of crushed stone.
The area of the foundation should be such that the monolith protrudes beyond the fireplace perimeter by 100 ... 150 mm on each side. The bottom plane of the foundation should be 150 ... 300 mm below the finish floor.
A foundation 1x1 meter is cast under the future fireplace (it is not in the very center of the room, but also does not adjoin the walls). Now the foundation level is 280 mm below the finishing floor.
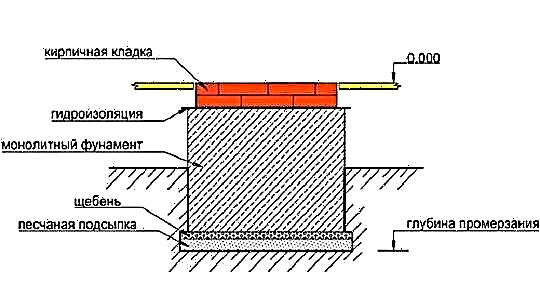
To the level of the floors, after creating waterproofing, the base of the fireplace rises with a reinforced screed.
Design and Calculation
Before building a fireplace, it is necessary to develop a suitable design for this structure. In principle, for your own needs, you can order a project in a specialized organization. But if you want to make a fireplace with your own hands from beginning to end, then designing should also be done on your own.
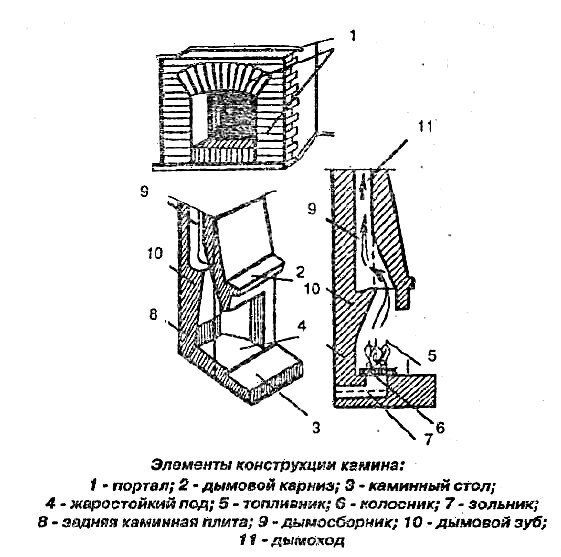
Each fireplace has several essential elements in its design:
- Portal.
- Cornice.
- A protective platform in front of the firebox (fireplace table).
- Under.
- Firebox.
- Grate.
- Ashpit (blew).
- Back plate.
- Smoke chamber.
- Smoke tooth.
- Chimney.
A lining is created in the interior of the furnace - a special finish made of refractory materials (refractory bricks may well play the role of a lining).
Calculating the main dimensions yourself is not difficult. In most cases, for this it is enough to know the area of the room in which the fireplace is installed. Using the table below, this can be done pretty quickly.


The lower part of the fireplace with a grate is shown in the diagram. The ash pan can be made completely open so that air can freely enter the combustion chamber. But for fire safety, it is better to install a special door at the entrance to the lower chamber.
A fashionable trend today is the purchase of finished fireboxes. The range of these products is truly huge, and their purchase will be justified. After all, installing a finished firebox greatly simplifies the design and calculation of the fireplace. A combustion chamber with an integrated ash pan can be installed on a special brick pedestal (30 cm high), and the space formed below can be used to store fresh logs.


Masonry fireplace
For the interior of the fireplace should be used chamotte brick. It withstands high temperatures well and shows high durability.
For exterior cladding, red ceramic brick should be used (brand - not lower than M200).
The stove gives off heat precisely to external bricks, which can be heated to decent temperatures, and only solid red bricks can be used during the construction of fireplaces. Voids simply greatly weaken the brick, and silicate in general emits all muck when heated.
The masonry mortar must be prepared on the basis of chamotte clay and quartz sand. The cement mortar option is best left out of your head. After all, nothing more destructive, absurd and unacceptable than the cement mortar used in the composition of the masonry, and you can not think of. Fireclay clay is sometimes called kaolin, and this ingredient is sold in most construction stores.
Not cement, but chamotte clay. Now on sale is completely different - for every taste and even color! There is no strong difference between them in quality.
Masonry begins with the creation of the basement row. The first row of bricks always stands on the edge, and the rest should be laid flat.
Before starting work, the used brick must be immersed in water for several minutes. This will significantly increase the strength of the structure, because moisture from the solution will not be absorbed by the surface of the bricks.
Before proceeding with the laying of the fireplace, it is necessary to draw up an order corresponding to the existing project. Further construction must be carried out in strict accordance with the order:
- pedestal
- firebox (starting from the 4th row),
- cornice and so on.

Chimney arrangement
After the "body" of the fireplace is ready, you can begin to create a chimney. Its passage should correspond to the calculated value. From above, the chimney should be reliably protected from precipitation. For these purposes, you should use a wide chimney hood made of galvanized sheet metal.
There is no better material for the chimney than red ceramic brick. This is what one of the participants in our forum thinks about this.
The advantages of a brick chimney are considerable. It is much more difficult to achieve the formation of condensate in a brick pipe than in a sandwich - you need to try. The soot ignition is not scary, the heating of the outer surface of the pipe in the attic is minimal or even completely invisible. The durability of a correctly folded brick pipe is many decades.
As a chimney, you can use a galvanized pipe made of heat-resistant steel. Such a chimney is made multilayer (the result is a kind of “sandwich”), on three sides it is closed with drywall.
In those periods when the fireplace is inactive, any chimney becomes the cause of drafts. In order to avoid such a harmful phenomenon, special valves (gates) are mounted in the chimney shaft. They open only when the firebox "comes to life", filling the room with pleasant warmth.
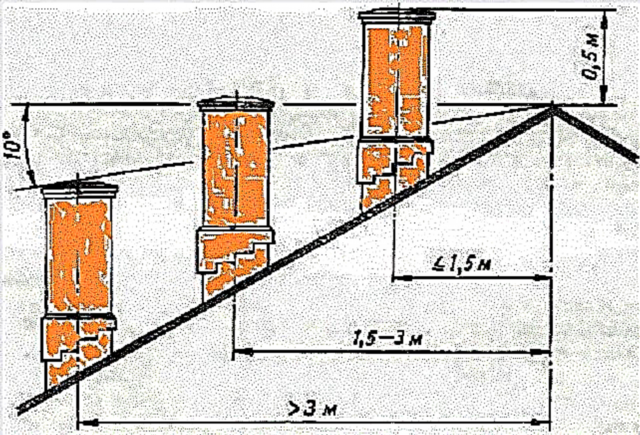
Particular attention should be paid to the height of the outer part of the chimney:
if the distance from the ridge to the chimney is less than 1.5 m, then the chimney should be at least half a meter higher than the ridge,
if the distance from the chimney to the ridge is more than 1.5 m, then the upper section of the chimney should not be lower than the level of the ridge.
Fireplace design
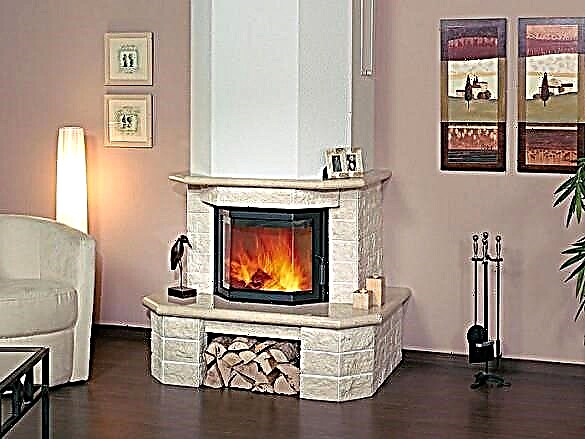
Design should fit the general style of the interior. And if during the construction a high-quality and aesthetic brick was used, then in order to give the fireplace a complete appearance, it will take a minimum of effort. It all depends on the owner’s imagination. In relation to the fireplace, you can apply bold design solutions using a wide variety of materials. It can be tiles or natural stone, marble or tiles. The main thing is that the materials have fire-fighting properties and do not collapse under the influence of high temperatures.
The heat transfer through the ceramic tile, as well as through the tiles, only increases (the density of the material is higher). From the surface of the glaze and from the sintered underglaze of the clay slip, when heated to 35 degrees or more, warm infrared radiation is initiated. It is much more intense than from a brick surface. Facing with tiles or porcelain tiles will definitely benefit.
By purchasing special sets for fireplaces, you can qualitatively improve the appearance of these structures. Indeed, the set of such a purchase, in addition to the required accessories (brushes, tongs, poker, etc.), includes a large number of additional coasters and decorations that can significantly transform the appearance of the hearth.

If you want to use a home fireplace as a decorative home heating plant, then you just need to visit the forum section on the construction of a fireplace stove. About what you need to consider when choosing a fireplace for a fireplace, you can find out in the corresponding section FORUMHOUSE. You can share your experience and get practical advice regarding the construction of a chimney for a home fireplace in the section “Choosing a chimney for a fireplace stove”. Also, an interesting video is available for all visitors to our project, which will help you to decorate your home fireplace with high quality.
How to make a fireplace with your own hands
The fireplace is strongly associated with homeliness. The crackling of logs, the heat and the mesmerizing beauty of an open flame create a warm atmosphere and have a quiet rest in the circle of those closest to you. On cold winter evenings, he is drawn to wrap himself in a rug and warm himself by the fire. It is believed that an open flame not only gives heat, but also burns down negative thoughts accumulated during the day. The fireplace will give unforgettable emotions and will become the highlight of any interior - it will create a romantic atmosphere and become an exquisite accent in the decor of the room. For residents of urban apartments, this is unacceptable luxury, but the owners of country houses and those who are just going to get a cottage can afford it. A special pride of the owner is a home-made fireplace. Its manufacture is a difficult and painstaking process, but the efforts will pay off with interest. We will tell you in detail how to build a fireplace in the house with your own hands. Following our step-by-step instructions, even a novice master will cope with the task.
Fireplace Classification
Fireplaces are classified according to several criteria: the appearance of the portal, the shape and size of the firebox. Small forms include fireplaces with a portal up to 51 cm wide, medium ones up to 63 cm, the rest are considered large. In form, they are classified into:
- Rectangular They are quite massive, so it’s better to install them in large rooms. Embed in the wall or go along it. The classic version is made of natural stone.
- Round. Usually placed in the center of the room and become the main element of the interior. They suggest the presence of free space around, so they are not suitable for small rooms.
- Triangular. They look original and stylish, do not take up much space. Ideal for small rooms with a modern interior.
- Cylindrical. More often they are placed in cottages and used as a grill.

Regardless of the shape, all fireplaces include the base parts:
- firebox
- ashpit
- grate,
- portal (building),
- chimney.
There are two types of combustion chambers - open and closed. Both designs have distinctive features. When choosing a type, the advantages and disadvantages of each of them are taken into account. An open fireplace is a classic version, arranged on the principle of a bonfire bred in nature. Fire is limited only by the brick walls of the fireplace; above the hearth there is a hood of a smoke collector.
The design of a closed firebox is more complicated and requires the presence of additional elements, such as a gate, transparent doors made of heat-resistant glass. It wins in terms of safety, as the firebox is hermetically isolated, and sparks to the outside are excluded.
There are 4 main styles in which fireplaces are performed.
The style of the fireplace is chosen for the interior in which it is located:
- Classic fireplaces have a portal in the shape of the letter P, made of cast iron, marble, wood or other natural materials. The traditional decor elements are bas-reliefs and sculptural compositions.
- Country (the word is translated from English as a province, village) is characterized by a D-shaped portal with a wooden beam on top. The most common material for a country fireplace is a porous stone.
- Modern. At the heart of the style is a classic, adapted to modern interiors. The shape of art nouveau fireplaces is rectangular or semicircular, stretched to the ceiling.
- Hi-Tech (English high technology). The youngest and ultramodern style. Fireplaces are made of the latest refractory materials, combine metal, concrete, glass and other experimental combinations. Often the quality of work is sacrificed for a spectacular appearance.
The materials from which the fireplace is made determine its reliability and duration of operation. We propose to make a fireplace with your own hands from a brick. You can make a combined version with the furnace part from heat-resistant (chamotte) material, and make the rest of the structure from red clay, or buy a finished furnace from cast iron, and build a casing, chimney and portal around it.
Particular attention should be paid to proper thermal insulation of the combustion chamber, especially if the fireplace is installed in a wooden house. Due to the increased risk of fire, it is recommended to protect the flooring, walls, roof and make a good thermal insulation of the fireplace.
Fuel oil
The material for the combustion chamber is steel or cast iron. Buying a finished firebox will greatly simplify the creation of a fireplace with your own hands.Another advantage of a closed cast-iron firebox is that it organically fits into modern interiors and looks very stylish.
A number of experts recommend fireclay bricks for laying out the inner area in a steel or cast iron firebox. Thus, open flame contacts with metal are minimized, which is especially valuable if the main material of the furnace is steel. A fuel basket is usually located under the combustion chamber. How the fireplace works ::
- Logs and firewood are placed on the grate of the combustion chamber, then they are set on fire.
- In a closed firebox, the size of the flame is controlled by the slide gate, which opens or restricts access to oxygen. In an open firebox, the only way to control the burning rate is to change the amount of firewood.
- In the process of burning wood, ash is formed, which accumulates in the compartment under the grate. It is called an ashpit. Periodically, the ash must be cleaned from there.
The ash pan can be built-in or extendable. The second option is much easier to use, therefore, preferable.
Gases from burnt firewood go outside through a special pipe. You can equip the chimney with a fan, which will create a forced draft. This will allow you to adjust the draft and increase the heat transfer of the fireplace.
We make a false fireplace in the apartment
One of the easiest ways to bring warmth and comfort to the apartment is to make a decorative fireplace with your own hands. It has several advantages compared to creating a real hearth:
- Easy. The frame structure weighs very little. No need to strengthen the overlap and agree on the redevelopment of the apartment.
- Safe. Imitations of fire can be installed without restrictions in apartments with small children and animals.
- Easy to manufacture. There are models that even children can cope with.
- Does not require a chimney. Smoke and soot are absent even when integrated with an alcohol bio fireplace.
Where is it better to set the hearth
Before starting work, you need to determine the type of design. She may be:
- Stationary. The frame of wooden blocks or metal profiles is attached to the wall. This allows you to make narrow and tall elements. They occupy a minimum of space, but the process of moving products to a new place is very time-consuming.
- Attached. Requires a broader, fundamental foundation. At the same time, it moves freely to anywhere in the apartment. And if necessary, it can be easily transported to another house.
The placement of the portal for a decorative fireplace is chosen based on aesthetic preferences and practical benefits.
- At the free wall. An impromptu hearth can serve as an independent decor. Visually complements the interior if placed under a mirror. The upper part serves as a shelf for hygiene items. Stationary models are used instead of the TV stand.
- In the corner. Most often, with this arrangement, the heating risers are closed. The design is done up to the ceiling, and for stability it is permanently fixed to the wall. It is important to leave access to pipe threaded joints requiring regular maintenance.
- In front of the radiator. The battery on the blank end wall is very difficult to beat with furniture. It's easier to decorate it. The focus in this case must be attached. To maintain the circulation of warm air, a convection grate is inserted into the makeshift furnace or lid.
Do-it-yourself fake fireplace: step by step instructions with photos
Different materials are suitable for creating the basis and decoration, in the work with which there are some peculiarities. Step by step we will consider four methods of manufacturing portals and give a selection of fresh ideas for their implementation. If you want to combine several options in one, first draw a sketch by hand. After all, even the layout of the most beautiful parts sometimes looks ridiculous. The sketch helps to visually evaluate the result and avoid mistakes.
Chimney
The chimney of the fireplace can be made of steel or brick. Ceramic finished constructions can also be found on sale today, but their construction requires special skill.

When designing a fireplace for a home, much attention should be paid to fire safety measures.
- The fireplace should stand on a solid foundation. The foundation for it should be separate, especially when it comes to a design with a brick firebox and a chimney. The weight of this design will exceed 1 ton, so in no case can such a fireplace be erected on a single foundation with the house. In the process of shrinking the house, the fireplace should not move, otherwise the tightness of the chimney may be impaired, and all carbon monoxide will go inside the house.
- The base must be made of fireclay bricks or put under the fireplace sheet iron, asbestos sheet. In this case, the sheet should protrude along the perimeter by at least 50 cm. This will prevent the spark from falling onto the wooden floor or protect the coating from accidentally dropped firewood.
- Protection of floors between the chimneys is also made of asbestos material. In the same way we isolate the walls that are next to the fireplace.
- Facing a fireplace depends on the style of the interior and the preferences of the owners.

The lining of the fireplace may be different.
It can be made of ceramic tiles, decorative stone, artificial marble. You can make a deaf box of drywall, giving the fireplace the desired shape and tiling it with tiles.
The construction of the fuel chamber is one of the most difficult and critical stages of work. The furnace is located under the chimney. A special role is played by the chimney tooth, which is one with the back wall of the firebox.
Base
The base is located above the fuel chamber and can be of any shape and size. The location of the furnace depends on the preferences of the fireplace owner: it is installed both on the floor and on a level with the table. This decision will affect the heat that the fireplace will produce - the lower the firebox, the better the air warms up. It is better to give preference to the firebox at the floor level, but such an opportunity is far from always. In multi-storey cottages, it will not be possible to establish an optimal design for heat transfer, because the ash pan must be placed under the stove. Ideally, it will be equipped in a basement with a foundation. Another way to equip the ashpit is below the fireplace with a retractable system. Maintenance of such a fireplace will not cause difficulties.
Of particular note is the choice of the inclination of the rear wall of the fireplace. Some experts are convinced that it is necessary to erect it strictly vertically, while others recommend a tilt at an angle of 300 degrees inward. Why do you need a tilt design? The fact is that the size of the combustion chamber affects the laying of the fireplace. For increased heat transfer, the walls are placed “on the edge”. Tilt improves the heat reflection of the living area.
Portal
There are only two types of overlapping portal - arched and straight. Arched ceiling fireplaces fit seamlessly into most design projects. Direct overlap is chosen for laconic interiors with strict lines.
More reliable arched ceiling. It transfers the vertical load from the upper rows of the masonry to the walls. The radius of the arch is half the width of the portal. Arches are divided into 3 types, depending on the shape: straight, arched, semicircular. A straight arch is chosen for laconic interiors in which a minimalistic appearance and clear geometry are needed. Despite the apparent simplicity of the form, direct overlap is the most difficult to do. The catch is in the need to very accurately calculate the angle of sawing a brick.
More reliable arched ceiling. It transfers the vertical load from the upper rows of the masonry to the walls. The radius of the arch is half the width of the portal. Arches are divided into 3 types, depending on the shape: straight, arched, semicircular. A straight arch is chosen for laconic interiors in which a minimalistic appearance and clear geometry are needed. Despite the apparent simplicity of the form, direct overlap is the most difficult to do. The catch is in the need to very accurately calculate the angle of sawing a brick.
Central location.
- The fireplace in the middle of the room will become a spectacular accent in the interior of the room. This design decision looks stylish and gives the home a special charm. In addition to aesthetics, the fireplace in the central part of the room has an important practical advantage - it is most effective for heating due to uniform air circulation. The advantage of a central location may also be a disadvantage. The fireplace will take up a lot of space and restrict movement around the room, so it is not suitable for a small footage.
Wall fireplace.
- The option has become one of the most popular due to the numerous advantages of this arrangement. It does not take up much space and at the same time cope with space heating. Near the wall fireplace, a well-equipped recreation area looks good. The only negative is increased security measures. To protect against fire, you will have to add a layer of insulation between the fireplace and the wall.
Corner fireplace.
- The best choice for small rooms, as it is very compact and does not take up much space. One more advantage - stylish modern design. Do-it-yourself mini-fireplace is easy to do. Other advantages include ease of installation. The design will hide all the flaws that may arise in the work of a beginner. If at a separate fireplace all walls are open and visible, then at a corner fireplace it is enough to cope without a flaw with the front part, the rest will be hidden by the finish.
Things to consider when installing:
- It is not recommended to place the fireplace opposite the entrance. Cold air will interfere with the circulation of warm, and the room will warm up slowly and unevenly.
- Brick fireplace put only on a separate foundation.
- The laying of the furnace should be made of heat-resistant chamotte brick, which cannot be bandaged with the main one.
- It is necessary to properly prepare the installation sites for the ash pan and doors, laying an asbestos cord and providing a gap for the expansion of the metal.
- The combustion chamber is left unplastered from the inside.
- When installing the rear wall of the fuel chamber, it is worth remembering about the slope. It is placed at a slight angle.
Remember the additional risks of fire and take measures to protect yourself from fire. It will be successful to choose a place away from the entrance. It is important to avoid drafts.
Rules that will extend the life of the fireplace and improve the quality of heating
The main measure for fire safety when equipping a fireplace is cutting in the path of smoke. Heat-resistant material is laid between the fireplace and the wall to which it adjoins. You can take asbestos, felt, basalt and others. The overlap should be thick enough, not thinner than 20-25 mm.
If the floor in the house is wooden, it should be protected from sparks. Around the perimeter with an indent of 30-35 mm, ceramic tiles are laid or a sheet of metal is laid.
In the place where the chimney passes through the ceiling, insulation is made of asbestos fiber or clay-soaked clay. It is worth processing the surface within a radius of 150 mm from the hole. The fireplace should have a separate autonomous chimney.
We must not forget about the rules of fire safety while using the fireplace:
- Avoid heating to maximum temperatures.
- Regularly clean the fireplace from soot and ash.
- Maintain a safe distance from the fireplace to nearby objects that can easily catch fire. The accepted norm is 70 cm.
- Choose only suitable fuel.
When creating a project for the future fireplace, it is necessary to correctly calculate its dimensions taking into account the size of the room. We give a table of the ratio of the width and height.
A simple formula will help you not to make mistakes in the calculations. The room area should be divided by 50. The size of the final furnace window is equal to the number obtained. A fireplace with a furnace window of 0.50 m2 is enough to heat a room of 20 square meters. When the width of the furnace is known, it remains to know its depth. It depends on her how efficiently the fireplace will warm the room. It is customary to take a depth of 2/3 of the height of the furnace for maximum heat transfer. A deeper firebox will make it worse to warm the living room. A significant part of the heat will go outside through the pipe and leave the house cold. In this case, the fireplace will lose its utilitarian function and will soon become a decorative object.
If you reduce the depth, smoke will go into the room. It is equally important to equip the chimney, which is responsible for the draft and safety from fire. To do this, set the correct height and diameter of the pipe outlet. According to the norms of SNiP, the minimum allowable diameter of the chimney is 150: 170 mm. 5 meters - the minimum permissible chimney height. If the house has high floors, you need to take it even higher, focusing on the ridge of the roof and the place where the pipe exits.
Step 1. Perform sketch and drawing
Introducing step-by-step instructions on how to make a fireplace in the house. At the preparatory stage, it is necessary to determine the location for the unit and calculate its main parameters. Before starting construction, it is necessary to complete the design of the fireplace. You can start with sketches of the appearance and approximate dimensions of the product in the scale of the room. Next is a detailed study of the circuit with the exact dimensions. While working on a project, study the fireplace in detail to better understand how it works.
- Draw a fireplace and draw its drawing
When the place is determined, it's time to draw a sketch on paper, then you need to decide what size the fireplace will be. It is necessary to calculate all the parties. Based on the data obtained, a detailed drawing is performed. Ready-made drawings of fireplaces can be found on the Internet and make your own based on them. It is worth remembering that all the design features of the fireplace are observed. The chimney system cannot be located at the height of beams or floors. It's time to choose the type of firebox and the location of the blower.
- Prepare materials and tools
You should already know at an early stage of work. what material will be lined with a fireplace. For the option “for bridging” you will have to buy an expensive red brick, and a cheaper option is suitable for decorative clinker tiles. Below is a diagram of the fireplace “under the layout”. Materials - red brick and stone for the furnace.
What is needed to make a home fireplace with your own hands:
- For the combustion chamber you need a heat-resistant chamotte brick (not lower than M200).
- For the whole fireplace, red ceramic brick - 250 pcs, not counting the chimney. it’s better to immediately take a small margin in case of errors. Enough 10% of the total.
- Mortar for foundation laying (components: fine sand, gravel, cement, water).
- Mortar for bricklaying.
- Base waterproofing (roofing material).
- Boards for the construction of formwork.
- Damper
- Metal door.
- Blew.
- Grate.
- Asbestos cord.
- Metal rods and wire for reinforcement.
- 0.8 mm metal wire for dressing.
- Asbestos cord.
Of the tools required:
- Trowel for laying bricks.
- The rule.
- Roulette and marker.
- Construction level, goniometer and plumb.
- Grinder for turning brick.
- Stapler.
- Bucket for mortar.
- Scoop and bayonet shovels.
- Bucket for mortar.
- Construction mixer or drill with nozzle.
- Construction hammer for the construction of formwork.
- Rubber hammer for laying bricks.
Step 2. Preparatory work
- Arrangement of the foundation.
The life of the fireplace depends on the strength of the foundation, so this stage is especially important.
In an already built house, it is necessary to take into account the location of the supporting structures of the house. Experts strongly recommend that you do not save time on installing a separate foundation under the fireplace. It will reduce the load on the foundation of the house itself and prevent the structure from deforming. It is easier to make a fireplace when the cottage is just starting to be built.Then the base of the fireplace is carried out in simple steps:
- take out the soil to the depth of freezing,
- make the formwork
- lay out a bed of sand and gravel,
- waterproofing with roofing material or polyethylene,
- reinforced with metal rods,
- pour the foundation on 2 bricks to the final floor,
- wait 20 days until the foundation is finally set
In an operated house, the installation of a fireplace complicates the need to open the floor and re-lay the coating. To dismantle the floor, it is necessary to circle the contour of the designed fireplace and add 15-20 cm indentation on each side. Then, a hole is cut out along the marked lines with a grinder. After soil coarsening, the same steps are taken. When the base is even with the finish floor, the gap between the stone structure and the coating must be carefully framed.
Preparation of brick for masonry.
When the foundation seized and froze completely, it’s time to start installing the fireplace. Brick is pre-sorted by size. The one that will be needed for work in the near future is soaked. So the brick will not absorb moisture from the solution. The advice from experienced stove-makers is to first lay out the fireplace “dry”, and only then start working with the solution.
Trial masonry will reveal complex and problematic places, thereby it will help to avoid a flaw, which is much more difficult to fix in the final version. The numbering of bricks with an indication of the number and sequence will simplify the work when the master moves from laying “dry” to installing a fireplace.
Step 4. Construction of the chimney
19-20 row. It's time to start the construction of the chimney.
21-22 row. The chimney continues, in the 22 row a chimney valve is installed.
In the 23rd row, a flare is performed, or, as it is also called, an otter. This is a branching structure in the form of a tail of a swallow. It is done in the place of maximum contact of the chimney with the roof. The height of the fluff is 29 - 36 cm. A riser is brought out above the fluff, it must be laid out until it touches the roof. The size of the riser and chimney should be identical. A protective metal umbrella is installed on top of the chimney to prevent precipitation and debris from getting inside. A weather vane can be installed on request. Experts recommend not to neglect it, as it improves traction.
Step 5. Facing work
To expand the seams of the fireplace, sieved river sand is added to the clay solution. The mixture is thoroughly mixed until it becomes thick and plastic.
Materials suitable for cladding:
- Stone cladding is an expensive but effective method of decorating a fireplace. Natural marble and granite are valued for their good thermal insulation and excellent aesthetics. Mountain minerals adapt to changes in temperature and pressure better than bricks and last longer. Natural stone does not fade and does not require special care, minerals are extremely durable, do not fade with time and practically do not require maintenance.
- Plaster. The material gives a huge scope for creativity. Using a decorative mass with a spatula, you can apply drawings and volumetric patterns. First, two layers of smooth plaster are applied, and on the third, finish, they make the design.
- Drywall. Often used in do-it-yourself fireplaces. During installation, it is necessary to monitor the evenness of the joints between the plates. The installation process will be simplified by the fixation areas on the walls, floor and ceiling. To facilitate the installation process, it is useful to mark the fixation areas on the wall, floor and ceiling structures. The position of the racks is regulated by a plumb line and a ruler.
- Tiles. Traditional material for decorating Russian stoves. These are ceramic tiles of an unusual shape. They heat up quickly and hold heat for a long time. The fireplace, tiled with tiles, will effectively warm the room and will become the highlight of the interior.
Step 6. Putting the fireplace into operation
Before starting work, the fireplace must be dried, because raw masonry is used for masonry. The first test kindling is carried out after about a week. All this time the fireplace is dried with the doors of the furnace and the ash chamber open in a natural way. After 7 days, the fireplace is lit, but not brought to a temperature maximum. Another week he is heated daily, not forgetting to check the draft.
Instructions for laying a fireplace with a cast iron firebox and a metal chimney
Steel chimneys have a significant advantage that facilitates installation - they can be led out through the wall. So the possibilities for choosing the location of the fireplace are much greater. We will need all the same tools as in the previous manual, but we need other materials:
- Cast iron firebox with glass.
- Silicone sealant.
- Sandwich pipe set.
- Clamps, tee.
- Elbow for 450 or 900.
- Bracket for chimney support.
- Mineral wool.
- Protective umbrella on the pipe.
- The foundation is being built separately. The procedure is standard and includes step-by-step deepening of the soil, construction of formwork and cementing.
- The walls are insulated, it is impossible to mount the fireplace directly. The space between the wall and the fireplace is laid out with superisole, if it is large, you can attach an additional wall of silicate brick to the foundation of the fireplace. This must be taken into account when designing a project. The wall in size should be 50-70 cm larger than the fireplace on each side.
- The foundation is laid in 2 rows with a solid brick.
- A pedestal is being erected, for this 4 rows must be laid out in red brick in the shape of the letter P. For a wide firebox, the width of the pedestal increases. The pedestal is needed to increase the heat transfer of the fireplace.
- An ash pan is installed.
- On the 4th row of bricks, grooves are made with a file, in which metal corners are installed edge-up.
The 5th row will go flush with the base under the firebox. Refractory mastic in 1 layer is applied to it. - A cast iron firebox is installed. An assistant is useful here, because the firebox is very heavy. The construction is carefully placed from the bottom up, observing the indentation from the back wall by 5 cm. While the mastic is solidifying, it is not too late to fix the flaws. Using the building level, the horizontal inclination is checked.
- The pipe is attached to the nozzle of the furnace
- The chimney is mounted from a sandwich pipe.
- The furnace is bricked. When the firebox is brought to the chimney, it must be bricked with heat-resistant glue.
- A lining of a cast-iron firebox is made with a brick. It is important to remember about a thermal gap of 5 mm between the outer casing and cast iron. There is no need for ordering, because the brick box is being built the same size as the finished firebox. When the lining reaches the chimney, it must be ensured that it does not rest on the pipe.
- The pipe is lined with drywall. Drywall is attached to the frame from a metal profile with self-tapping screws.
- A portal is formed around the chimney. From the inside, it is insulated with mats of non-combustible materials, which improves the thermal insulation of the structure. Mats are attached with a foil side to the firebox.
- The external part is sheathed with drywall.
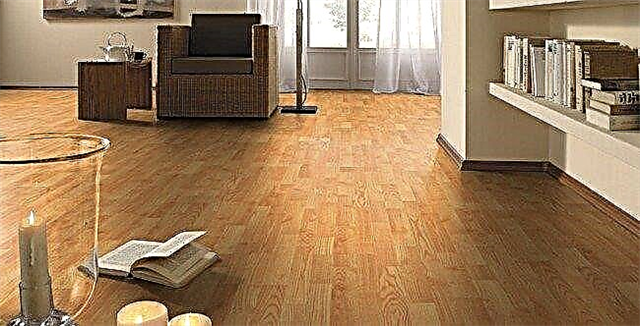
- Facing work is underway. It all depends on the imagination and skills of the master. You can beautifully decorate a fireplace with any material: from simple plaster to a spectacular decorative stone. After finishing work, you can proceed to laying the floor. Parquet or laminate should not be brought close to the fireplace. Recommended distance - at least 80 cm.
- The final stage is the drying and kindling of the fireplace.
The fireplace is finally ready for work and will please the owner for many years if all the nuances and recommendations were taken into account during the work. Our step-by-step guide will help to make a truly high-quality and durable thing that will decorate the interior and fill the house with warmth.
It is especially nice to complete all the steps from the project on paper to the tab yourself. Do not be afraid to pick up tools and put them into action. Even a novice master can cope with the task, when each step is planned ahead.
Place for the fireplace
You can attach the fireplace to the wall, make it stand-alone, or build it into the wall. Also, the hearth can be erected in the corner of the room.
It is strongly recommended not to equip the fireplace insert near the wall opposite to the wall with windows, as this will lead to drafts.
Remember to have an efficient and reliable chimney. The standard length of the smoke exhaust structure is 4-5 m. In some situations, this figure increases to 700 cm.
 Place for the fireplace
 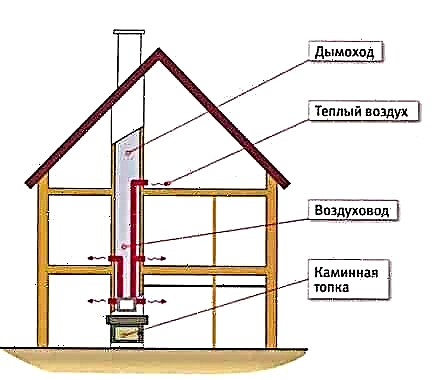 Fireplace chimney
In a room with a fireplace, quality ventilation must be organized.
Directly erecting a fireplace is carried out on a solid site, capable of supporting the weight of the finished structure.
Definition of the main sizes
Perform the necessary preliminary calculations. Determine the volume of space allocated for the construction of the fireplace. The firebox opening should be 1/50 of the volume of the room calculated by you.
The height of the portal should be 2 times the depth of the firebox.
The dimensions and ratios given are very important. If the depth of the furnace is greater than the permissible value, the fireplace will significantly lose in heat transfer. With a smaller size of the firebox smoke will occur.
Select the smoke holes according to the dimensions of the furnace area. The cross-sectional area of the chimney should be 10-15 times less than the area of the furnace.
The optimal diameter of round chimneys is an indicator of 100-150 mm. The length of the chimney can reach 500 cm or more.
Preparation of materials
Prepare the required amount of ceramic bricks (determine in accordance with the planned dimensions and design of the fireplace). Also prepare fireclay bricks for arranging the firebox.
 Fireclay brick
  Fireclay clay
Additionally prepare the following:
- mixture for bricklaying,
- 12 mm glass-magnesium sheet,
- chimney,
- oven tape for mounting accessories,
- metal corners
- chimney view.
Before starting work, cover with polyethylene everything that needs to be protected from contamination.
Second step
Lay out 4-5 rows with an arrangement of an ash pan.
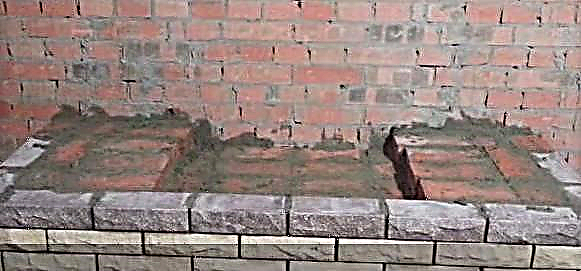 Masonry fireplace, step by step instructions
  Masonry fireplace, step by step instructions
Third step
Lay out 6-7 rows with the arrangement of the bottom and salary of a brick fireplace.
 Masonry fireplace, step by step instructions
  Masonry fireplace, step by step instructions
  Masonry fireplace, step by step instructions
  Masonry fireplace, step by step instructions
  Masonry fireplace, step by step instructions
  Masonry fireplace, step by step instructions
  Swing and formwork for masonry arch
  Masonry fireplace, step by step instructions
 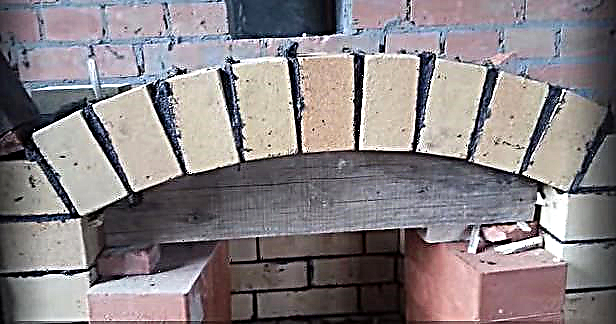 Masonry fireplace, step by step instructions
  Masonry fireplace, step by step instructions
Fifth step
Lay out 14-19 rows with the arrangement of the smoke collector.
 Masonry fireplace, step by step instructions
  Masonry fireplace, step by step instructions
  Masonry fireplace, step by step instructions
  Masonry fireplace, step by step instructions
  Masonry fireplace, step by step instructions
Sixth step
Lay out 20-25 rows of fireplace with the arrangement of the chimney.
Equip the base and continuous rows of masonry using a trowel or trowel. The chimney and fuel chamber are laid out manually, as at these stages it is very important to control the quality of the solution used.
Apply the mantel mortar to the middle of the bricks. The edges of the elements must remain free.
When laying out each row, stick to the selected order. For greater convenience, you can number the products.
Pay special attention to the quality of the masonry of the fuel compartment and the flue ducts - these elements must be laid out as evenly and as airtight as possible.
Remove excess masonry mortar immediately.
Learn how to make a fireplace in the apartment with your own hands with step-by-step instructions from our new article.
For the formation of a beautiful curved fireplace vault, gradually fill the masonry elements. It is important that the inlet size does not exceed 50-60 mm in each row.
Arrangement of curved jumpers is performed using a temporary formwork - a circle. To fix such formwork, use the supports under the equipped fireplace vault.
Laying starts from the brick installed in the center, and then perform symmetrical laying in both directions.
Periodically check the vertical layout of the flue pipe. Even the slightest deviations from the vertical can lead to smoky rooms.
 Masonry fireplace, step by step instructions
For laying the chimney, use a mortar with the addition of cement, similar to the mixture used when laying the base of the fireplace.
The chimney is necessarily covered with a layer of refractory insulation to increase fire safety. Insulation is arranged in the places where pipes pass through the structure of the house (floors, roofing, etc.). The most commonly used insulation materials are asbestos-based.
Finish
To give the fireplace a more attractive appearance, finish it. The most commonly used finishing methods are:
- painting,
- plastering,
- tiling, stone and other similar materials.
 Finish
Choose a specific finish option at your discretion. If you like the fireplace even without finishing, embroider the masonry joints with a special tool and thoroughly clean the surface of the structure from excess mortar.
Important: only fireproof paintwork materials can be used to paint the fireplace.
The rest of the appearance of the fireplace depends solely on your imagination and personal preferences.
Follow the recommendations received, and the finished fireplace, built on its own, will for many years heat and decorate your room, effectively coping with all the tasks assigned to it.
Types of fireplace: configuration and location
Starting the project of arranging a fireplace in the house, first of all, it is necessary to think over the place of its placement.
There are several options for placing this heating unit:
- Central location. By placing a fireplace in the middle of the room, you certainly make the main emphasis on it. It looks stylish and allows you to give the interior a special charm of suburban comfort. This arrangement also allows you to effectively warm the room, as warm air will circulate freely throughout the room.

The central location of the fireplace
But there is a drawback in such a dislocation: the fireplace will occupy a large part of the area and interfere with movement. Therefore, if you are constrained in square meters, then it is better to refuse this option. Wall fireplace. One of the most common options, which has a lot of advantages: saving room space, efficient heating, the ability to create a separate recreation area, etc.

The only disadvantage is the factor that you have to take care of fire safety and lay an additional layer of insulation between the fireplace and the wall. Corner fireplace. This option is suitable even for the smallest room, since it occupies a very small area. In addition, the angular design looks especially stylish. Another advantage of this arrangement is a simple ordering scheme, which even a beginner in the furnace business will cope with.

If for the construction of a free-standing fireplace you need to have some experience, knowledge and skill, since all the walls are in sight, then the angular design will allow you to hide all the flaws. The main thing is to perform well the front part, all other sides can be hidden from the eyes with finishing materials.
The following factors should also be considered:
- The wall opposite the entrance to the room is not the best solution, since the cold air blown in will interfere with the natural circulation of warm air.

The location of the fireplace in the house
Basic rules for the construction of a fireplace
In order for the fireplace to serve and please with its warmth for a long time, it is necessary to strictly follow the basic rules when erecting it:
- A brick fireplace is being erected on a separate foundation.
- For laying the firebox, it is necessary to use exclusively fireclay (heat-resistant) brick, which should not be tied to the main one.
- In places where the door and ash pan are installed, it is necessary to lay an asbestos cord and leave a gap for metal expansion.
- Do not plaster the combustion chamber from the inside.
- The rear wall of the fuel chamber should be slightly inclined.
Do not forget about fire safety, because any design that runs on solid fuel poses an additional risk.

The main point of fire safety in the arrangement of a fireplace in a country house or in the country is the installation of cuts in the path of smoke.
If the wall is adjacent to the fireplace, then heat-resistant material (basalt fiber, asbestos, felt, etc.) must be laid between it and the heating unit. The thickness of such an overlap should be at least 20-25 mm.
If the fireplace is installed on a wooden floor, then it is necessary to lay a metal sheet around the perimeter or to perform a ceramic tile coating with an indent of 30-35 mm on each side.
In a radius of 150 mm from the chimney, where it passes through the ceiling, it is necessary to organize reliable thermal insulation from a double layer of felt with clay impregnation or asbestos fiber.
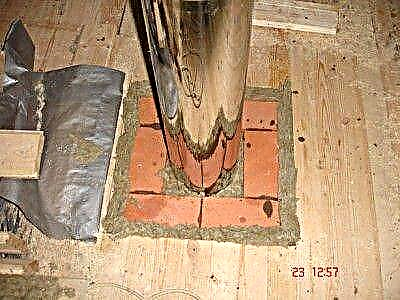
Felt layer between pipe and roof
The chimney should work autonomously with only one fireplace.
There are also certain fire safety rules when using a fireplace:
- Do not bring the fireplace to maximum temperature.
- Systematically clean the fireplace from ash and soot.
- The safe distance between the fireplace and the closest flammable objects should be at least 70 cm.
- Use only suitable fuel for the country fireplace.
We calculate the size of the fireplace correctly
When designing and creating a drawing of the future fireplace, it is very important to correctly calculate its width and height.
| Dimensions of elements, mm | Room Area | |||||
|---|---|---|---|---|---|---|
| 12 m2 | 15 m2 | 20m2 | 25 m2 | 30 m2 | 40 m2 | |
| Portal Width | 400 | 500 | 600 | 700 | 800 | 900 |
| Portal Height | 420 | 490 | 560 | 630 | 700 | 770 |
| Furnace depth | 300 | 320 | 350 | 380 | 400 | 420 |
| Rear wall height | not less than 360 | |||||
| Back wall width | 300 | 400 | 450 | 500 | 600 | 700 |
| Smoke box height | 570 | 600 | 630 | 660 | 700 | 800 |
| Section of a chimney with a rough inner surface | 140*270 | 140*270 | 270*270 | 270*270 | 270*400 | 270*400 |
| Chimney section with a smooth inner surface | 140*140 | 140*270 | 140*270 | 270*270 | 270*270 | 270*270 |
The dimensions of the furnace depend on the area of the room. There is a simple formula that will allow you to correctly perform all the calculations:
We measure the area of the room and divide it by 50.
The resulting value is the size of the furnace window.
To heat a small room of 20 square meters, a fireplace with a furnace opening of 0.50 m 2 is enough.
We suggest also using the table to correctly calculate all the necessary parameters for the future fireplace.
After calculating the width of the furnace, you need to determine its depth. The efficiency of heating a fireplace directly depends on this parameter. According to the standard calculation formula, it equals 2/3 of the height of the furnace.
If you ignore this factor and, for the sake of appearance, decide to increase the depth of the furnace, then this will directly affect the heat transfer of the fireplace.
Almost all the heat received from the combustion of firewood will go through the pipe to the street. In this case, the fireplace will fulfill rather a decorative function, pleasing with a beautiful reflection of fire. You will only have time to put firewood in the furnace.
When reducing the depth of the combustion chamber in relation to its height, there may be a chance of smoke in the room.
In addition to the correct calculation of the furnace, much attention should be paid to the arrangement of the chimney, on which fire safety and good traction depend.
First of all, you need to correctly calculate the diameter of the pipe outlet and its height.
According to the norms of SNiP, the diameter of the chimney must be at least 150: 170 mm. If you chose a chimney with a rectangular cross section, then its width should be 1/10 of the size of the combustion chamber.
The height of the chimney must not be less than 5 meters. But sometimes, with high floors, you will need to raise the chimney even higher. In this case, we focus on the roof ridge and the pipe outlet.
The figure shows how to correctly display the height of the chimney.
Chimney height above the roof
Therefore, consider all these parameters well before you start building a fireplace with your own hands.