“I have a summer house, and in the summer house there’s a bathhouse, and at the bathhouse there are doors - I made them myself.”
Greetings, dear reader!
Someone will think that, in general, everything is clear. Wooden bath - wooden doors. That's why I decided to open the "narrow" topic – how to make the door to the bath yourself. And how easy it is for you to decide. Why do I say that?
Yes, because I know: on paper everything is fast, easy and elementary. In fact, it’s the exact opposite, especially if you are a city dweller and do not have practical skills. And in the absence of good tools, it’s a “trumpet business."
Immediately on the consequences of the "wrong" door to the steam room. Here are perhaps the most common ones you meet most often:
- Draft. This is when you are at a temperature of "about a hundred," you feel a chill in your legs. It happened?
- Poor front / porch doors. It seems not scary, but annoying, and the more often, the more.
- The formation of frost on the door. It occurs immediately after kindling. As you will notice, you immediately understand – something is wrong.
These horror stories have one common reason. – manufacturer incompetence.
From this article you will learn:
What to do
First of all, deciduous trees are welcomed, among which the “bath” species are the best - from linden and oak. I do not advise Aspen, as she is very “fond of wobbling”. I hope the carpenters and joiners understood me. Pine is quite suitable, just choose fewer knots, because it is in these places that the high content of resin. And we do not need it at all.
"A compromise option - the main canvas of conifers is planked with deciduous planks."
When you select lumber, you should pay attention to these points:
- a) The material should be relatively dry, but at the same time have natural moisture,
- b) There should be no traces of any rot on the surface. Or the dark spots under which it disguises itself
- c) It is necessary to choose boards with the least number of knots.
Having chosen a tree species, and having decided on what your creativity will look like, you can begin to "needlework".
DIY manufacturing and installation
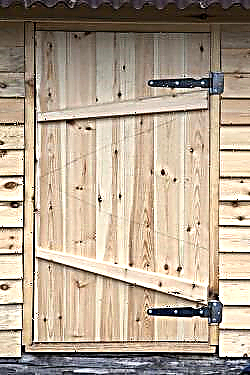
Probably, from ancient times, trying to keep heat as much as possible, wooden doors in the steam room were set single-winged and small. As a rule, their height is in the range of 150-170 cm, and the width is 60-70 cm. The exception is the Russian sauna "in the black." Here a double door is quite appropriate.
«Important! Doors swing open one way - out! By the way, this applies not only to the steam room, but also to the dressing room, washing and even the entrance. " If it is a log house, then the bath door is installed after it has shrunk. Do it earlier, get the risk in the form of distortions and cracks that have arisen due to a violation of the geometry. There is an alternative - to leave a gap for shrinkage of 5-8 cm at the top of the door frame. "
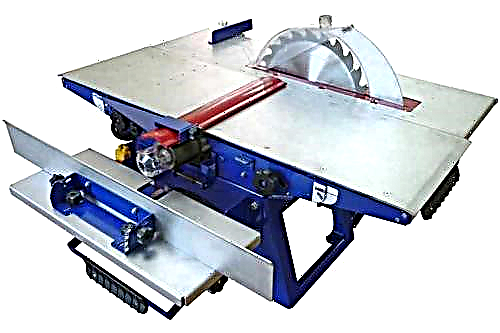
For a Russian bath, the most suitable is a deaf wooden door from the boards. We will consider it. For the manufacture we need the following tools:
- Saw or jigsaw,
- A plane, and if possible, a surface gage (for planing boards of the same thickness and immediately across the entire width) is an ideal option,
- Chisel or chisel, hammer,
- Screwdriver or screwdriver,
- Milling cutter for sampling the "quarter" (although it is possible and a plane with a special nozzle),
- Sandpaper, or better, a belt sander,
- Roulette, level (preferably laser), square, pencil.

AND materials:
- sheet pile: 30 mm thick and 150 mm wide,
- Timber: 60 x 80 mm, but a smaller size is also possible,
- Hinges: 2 pcs.,
- Screws
- Adhesive just for decoration (type PVA)
Getting down
- Saw the boards to the length you need and plan them well on all sides with a planer (jointer). Since the doors will be operated in conditions of excessive humidity, make the dimensions 5 mm smaller than the distance that is between the quarters of the door frame (I think they understand that this is a reserve taken to swell the door from moisture).
- Mirror a quarter on each side. From the sides, however, from different planes. So that after joining, the boards are overlapping. Choose one of two options for fastening boards. On a well-processed puffer with glue or with a quarter selection (but also on an adhesive basis).
“The best solution for reliability is a spike groove. If you have the opportunity to manufacture on equipment - go ahead! Milling cutter owners, got the hint? ”
- Assemble the boards so that the gap is no more than 1 mm. Mark them with numbers and marks on the mating side. We begin bonding. Use wedges and stops for pressure. Measure the diagonals for uniformity, and the canvas for parallelism.
After drying, treat the entire surface with a grinding machine, using sandpaper with coarse grain (60 - 80 units).
- Fasten the web using the cross bars. Use self-tapping screws for this.
“Immerse the self-tapping hats on the board or use hardware with a corrosion-resistant coating.”
- We begin fastening the harness. We connect the bars with each other in half boards (with an overlap or in a spike). For fastening we use glue (such as PVA) and self-tapping screws - 2 pcs each. for short, and 3 pcs. for long ones.
“If the manufacture of strapping is difficult for you, or you do not consider it mandatory, then be sure to glue horizontal bars to the ends of the canvas. They will reduce the moisture of the tree. "
So, we outline the place of future fastening. At the end of the door handles, drill holes. Then we attach the handle to the door and using a drill with a diameter smaller than the previous one, drill through (grabbing the door). Then we take a self-tapping screw (large length) and screw it all the way so that it fits 2.5 - 3 cm into the board. A similar action is performed with the other fixing hole of the handle. We insert a pin into the holes, preferably from the same tree, and process the place with sandpaper.
- The last stage is finishing grinding and impregnation. To do this, we process the surface with fine sandpaper (grain size 180-240). Then we apply an antiseptic, but keep in mind that it should “keep the temperature” without any problems. After it dries, cover 1-2 layers of drying oil. This applies only to the front door; you should not unify your creation in the steam room.
The door leaf is ready, collect the box
- We take bars of rectangular or square cross-section to the required length. After which we select a quarter milling cutter. Be sure to make a backlog of at least 5 mm. This is necessary to prevent jamming when the door boards swell from moisture.
- And further. The vertical bar should have a width slightly less than the door. And the threshold is made at least 10-15 cm high.
- To fasten the bars of the box, grooves are cut at the edges of the upper and lower heads, and spikes are cut along the edge of the upper bar and the nut.
- We assemble the box and we monitor the accuracy of the corners. If necessary, modify the grooves.
Door installation

- We cut out the opening in the wall. It should be 5-10 mm wider than the width of the box. This will allow to correct the door vertically during installation, tearing it open with wedges,
- Now you can install the box (but make no mistake, with the opening side)
- We start a horizontal upper beam and props up with racks. We lay the threshold on the floor. We check the level of the vertical and horizontal boxes,
- The existing gaps between the wall and the box are wedged with wedges of the right size. This will fix its location. Then we fasten the box with screws to the wall through pre-drilled holes,
- We install door hinges on the door leaf. Best brass. They are strong and do not rust. We put the first loop at a distance of about 20 cm from the top edge, the second - at 20 cm from the bottom. Another option is to use long decorative patch loops. They look very solid and give the door a kind of elegance,
- It remains to hang the door leaf, check that it opens completely and freely, and that there are no gaps. Then it remains to close the cracks between the wall and the box. To do this, use tow, felt, jute, etc. And you can blow out with foam. Although there are some opponents of the use of this material in the bath.
Conclusion
Finally, I want to say one thing: there are a lot of options and ways to mount doors for the bath. But everyone can choose the most suitable for themselves. So, think, dare, create! Next time I’ll tell you how to make a simple bath door without glue, using only self-tapping screws. Even a beginner can handle it. And the video below also demonstrates the manufacturing method - the transverse bars are attached to the “dovetail.” "
Anecdote about the door:“A drunken husband knocks on the door, his wife does not let me go.
The husband shouts: - Who is the boss in the house?
Wife: - Whoever is in the house is the master!»
Was it informative? Then subscribe to blog updates and introduce friends to us. Good luck and good doors to your bath! See you soon!
Quote of wisdom: You can know everything except yourself.
Doors to the steam room
Steam room is a room characterized by sharp changes in temperature and humidity. Such conditions put forward special requirements to the door:
- the canvas must not deform, warp, change its size,
- handles should be made of wood so as not to burn your palms or other parts of the body,
- there should not be any knots or tarred pockets on the door surface to prevent the risk of scalding with hot tar. Ideally, coniferous boards should not be used. The door to the steam room is best made from a material that does not emit tar or other harmful components.
In addition, the door to the steam room should open outward (in principle, this is the usual rule that prescribes to open doors along the route during evacuation).
It is not recommended to use sheet materials capable of releasing harmful substances (particleboard, plywood and other types) when heated. In addition, from high humidity, such doors quickly collapse, spoiling the interior of the room.

Doors to the street
The front door to the bathhouse is operated in more familiar conditions. As a rule, neither high temperature nor high humidity is observed near the entrance. The main requirement for the door leaf is strength, reliability, sufficient thickness. The restriction on the use of coniferous wood is removed, which allows to save on material. You can also use sheet materials that are less responsive to atmospheric humidity, do not change size and are not deformed. However, it is necessary to protect them with a layer of paint or varnish.
Installing a metal door for the bath is impractical. This option is chosen by the owners of cottages, appearing there only occasionally. The problem is that the metal sheet itself can become the prey of country thieves.

Material selection
The choice of material for the manufacture of the door is an important and crucial step. The main criteria are:
- the availability of skills to work with this or that material,
- availability, affordable price,
- the ability of the material to withstand loads and work freely in the intended conditions.
Consider the possible options and their features:
Wood
This is a traditional material for making doors. It is easier to make a wooden door on your own, since almost every owner of a house or summer house has the skills to work with the material. Wood is on sale, the choice is wide enough, the cost is affordable for everyone. The most common conifers, which grow in abundance in our country. They have different properties, so you should talk about them specifically.
There are several varieties of this tree. In Russia, cedar is called cedar pine, which differs from Lebanese cedar. Available in our country, wood has a soft, straight-layered structure, is easy to process, and has a light, slightly yellowish color. A feature of the cedar is a fragrant, resinous smell that does not like midges, mosquitoes, and midges. Cedar is rarely affected by a wormhole, resistant to decay. It will turn out a good door to the steam room, you just need to pick up boards without tarry exits.

Pine
This is the most common breed in Russia. On sale pine lumber is presented in all types, there are different sizes and shapes. Pine has light wood, sometimes reddish on the core. The hardness is medium, easy to process, light in weight. However, there are also disadvantages, the main of which is susceptibility to decay, the appearance of blue, fungus, and wormholes. When buying material, you should carefully sort through the boards. Doors made of pine are most often found in the interior of a bathhouse or other rooms.

Larch
Larch is the densest and hardest of all conifers growing in Russia. It is heavy, prone to warping, turning the plane with a screw. At the same time, the boards retain their shape until the end of the drying process, they begin to warp at the very end of the process. Processing larch is much more difficult than other conifers. A sharp tool is required, it is necessary to drill under the screws. Contains a lot of resin, which flows abundantly from knots. A feature of larch is the almost complete absence of rot. A large amount of resin protects the material from the effects of putrefactive bacteria, mold and fungus. Inserting the door into the larch bath is best at the entrance, or into the washroom. The door for the steam room from it will be too heavy and unstable.

Fir
It is soft, light wood. It is close in its qualities to a pine or cedar, but does not have a pronounced core part. There is not much such material on sale, since there are very few large industrial stocks of fir. In addition, there are no wide boards from fir, since its trunk rarely exceeds 150 mm in diameter. In addition, knots are evenly placed along the entire length of the boards (like on spruce), which increases the risk of resin from heating. Fir bath door - a dubious decision. It is best to use it for other purposes.

Fir boards covered with knots. They have light wood, prone to rotting or warping. However, its straight-layered wood is widely used for the manufacture of various products, musical instruments, and souvenirs. Spruce wood absorbs moisture well, but it is more difficult to soak it with an antiseptic than pine or fir. For the door to the steam room, the material is suitable with restrictions; it is better to use it for an entrance or a washing compartment.

Glass
Installing a glass door in the bath is a dubious decision. There are solid canvases made of this material, but they are very thick (more than 10 mm) and require special processing of the faces. In addition, it will be difficult to attach hinges to such a door; special turning elements will be needed. It will be too heavy and dangerous canvas that can burn people. Usually a glass door is made into the steam room, consisting of a wooden trim and a transparent insert (one or more) in the central part.
Attention! On the Internet, there are often recommendations to make a glass door to the bathhouse with your own hands, a photo of which shows a continuous canvas of thick hardened material. Please note that self-processing of glass at home is not possible.

Metal
Metal doors to the bath, as a rule, do not use. They do not fit into the general style of the room. In addition, the operating conditions are not suitable for paintings of such materials. Sometimes they install steel doors to the entrance, or use aluminum structures to arrange the entrance to the washing room, to the rest room. However, such solutions are quite rare.Metal doors are not suitable for installation in a steam room, because they are very hot and can burn people.

Combinations of various materials
Canvases made from a combination of several materials are common. They become a good alternative to traditional solid wood doors. An example is the frame door to the steam room, which is a frame filled with a heat insulator and lined with decorative material on top. The result is a canvas that is able to effectively retain heat and does not change its size due to external conditions. Sheathing is most often done from the lining with their own hands, which is cheaper, looks more attractive. Such a door corresponds to the style of a sauna or a Russian bath, it is easier and more practical.
Material calculation
The amount of material depends on the chosen design and dimensions of the canvas. The easiest way to draw up a working drawing and specification, which will indicate all the necessary parts and their sizes. This option gives the most accurate idea of the quantity and type of materials. It is pointless to calculate the amount of wood in cubic meters, since the volume does not matter here.
First of all, the box for the door leaf is calculated. To do this, take the size of the door and add the double thickness of the board in height and width, minus 2 cm on each side. This is adjusted for the quarter forming the narthex. The calculation of the canvas is easiest to do according to the width of the boards. It is necessary to collect a shield according to the size of the opening and add about 10-15% for processing.
Important! Please note that any calculation will be approximate. During work, different situations may arise, along the way, plans often change. Therefore, a certain supply of material is needed to make the necessary adjustments without the need for searching and preparing wood.

Tools Required
To make a door with your own hands from wood, you will need:
- circular saw or circular saw,
- jigsaw
- electric planer
- electric drill with a set of drills,
- manual or stationary milling machine,
- hacksaw,
- chisel,
- hammer,
- pliers
- ruler, square, tape measure,
- a simple pencil for marking,
- Awl and screwdriver for screwing screws.
Since you will have to install the door to the bath yourself, you will need a building level and a set of mounting wedges. In addition, you will need a heater and sealant to fix and seal the cracks between the box and the opening.
How to insulate the door?
Thermal insulation of the canvas is an important task. Most of the losses occur precisely on this element, therefore, it is necessary to eliminate them as much as possible. Not all doors can efficiently store thermal energy. In addition, a draft becomes a frequent problem due to improperly configured windows or ventilation outlets.

The solution is to warm the canvas or install a cut-off that reduces the intensity of the air flow. It is usually necessary to decide how to insulate the door in the bathhouse with your own hands after installation, which makes the task a little easier. Modern heaters allow for efficient heat saving with a minimum consumption of materials. Consider the most common options:
Using a thermal curtain
This option refers to the simplest and most affordable methods of insulation. A canopy of dermantine, thick thick fabric, etc., is hung in front of the entrance sheet. the size of the curtain should be 10-15 cm larger than the size of the passage.
Passing through a continuous canopy is not easy. Some users hang it on a pipe with rings (like a curtain in the bathroom). However, many visitors forget to pull it behind them, which reduces the effectiveness of insulation. The best option is to cut the canopy into strips of 15-20 cm and fasten them in the upper part. The strips overlap, so that in a free state they more tightly cover the passage.

Using energy flex
Doing the door more efficiently in the bathhouse with your own hands is done by mounting the heat insulator directly on the canvas. A good option is a roll-fed energy flex. This material is made of foamed polyethylene, with a thickness of 3 to 25 mm. It does not absorb water, does not change its size from the temperature difference, does not create an extra load on the door leaf.
Attention! There are many materials like energy flex. For example, there is an isolon, also made of foamed polyethylene. Its feature is a foil layer on one or both sides, capable of reflecting thermal (infrared) rays back to the room, thereby preserving thermal energy.

Insulated frame
This design allows you to seal the gap between the canvas and the box. This is an important and useful technique, since the doors in the bathhouse are almost impossible to fit very accurately. They swell and stop closing. We have to plan the edge of the door, achieving free entry into the opening. Then the wood dries up, a noticeable gap appears. And this process is repeated many times.
To exclude constant adjustment, a frame of strips is nailed to the outside of the door leaf. They are installed at a distance of several centimeters from the edge, and a strip of thermal insulator folded in half is laid under them. It should protrude beyond the limits of 15-20 mm, so that when the door is closed, the entire perimeter is covered with insulation. The gap between the door and the frame is closed, drafts disappear, the heat leak stops.

We choose the accessories for the door
The criteria for choosing accessories for the door to the bath are:
- the purpose of the door (entrance, to the washroom or the steam room, etc.),
- door and frame material
- general styling of the bathhouse.
The door handles on the canvas of the steam room should not heat up and burn people. Here we put only wooden products, of which there are a lot. It is recommended to select models that correspond to the general style of the bath design. This is a trifle that can significantly change the appearance of the room.
Hinges are also selected based on the appearance of the doors. Locks or latches are installed only on the front door, less often at the entrance to the rest room or to the washroom. Working conditions are unfavorable for metal parts, so their service life will be significantly reduced.

Preparation of materials and tools
Material preparation is the most important process. The operating conditions of the bath door are characterized by constant changes in temperature and humidity. Wood has the ability to absorb and give water, which makes it difficult to store. Over time, it stabilizes and stops changing its size, but the ability to warp or crack appears. The best method of drying is considered to be the natural exposure of the material in a dry place, protected from direct sunlight. The temperature should not be low, the best option is the living room conditions. In this case, the removal of moisture occurs smoothly, the boards do not gain unnecessary stress, do not crack and do not turn around with a screw. The only, but very significant drawback of this method is the duration of the process. It takes many months, so most users prefer to buy wood that has already been dried under production conditions. It is considered ready to work, but it will also have to withstand about a week to set the appropriate humidity.
The basic tools for working with wood are usually every home craftsman. If any devices are not enough, you can buy or rent them.

Important! It is impossible to start manufacturing a door without having the necessary tools. The process will stop at the first shortage of an item. It is necessary to prepare a complete set to complete the assembly and installation of doors in a short time.
Door leaf fabrication
The easiest option is to assemble the sheet from the tongue and groove board (the floor rail is suitable). Cut several boards along the valley of the canvas (if you plan to strapping, subtract the double width of its strips). Edges are machined by removing a tenon on one side and a groove on the other. To fix the shield, you can use the old method of installing a wedge strut that holds the shield in the plane and does not allow it to crumble. Usually two such spacers are made, between which a slanting bar is installed to fix the diagonal. You can do without it, if the wedge elements are not installed in parallel, but at a small angle to each other. This will strengthen the canvas and reduce its drying.

Gluing boards
Bonding the shield is not a prerequisite. In traditional constructions, glue was not used, since the operating conditions of the door are unfavorable for old adhesive compositions. However, modern varieties tolerate contact with moisture, so they can be used during assembly.
The main task will be a high-quality screed shield. The glue is applied to the edges of the bonded boards, laid on a horizontal flat base and tightened with clamps. You will need large and powerful devices, however, you can do with ordinary wedges. The shield on one side rests on the bars fixed on the base. On the other hand, at a certain distance from the edge of the shield, another block is fastened. They put a pair of wedges in the gap, and, while hitting them, squeeze the shield. The adhesive composition protruding from the slots is immediately removed with a rag. When the glue dries, the wedges are knocked out and get a qualitatively glued shield.

Web binding
The door trim is made to strengthen the central part, to exclude bending or skewing diagonally. There are two ways:
- harness in the form of a frame with a groove on the inner edge. The central part along the entire perimeter is equipped with a spike, which, when assembling the door, is inserted into the groove of the harness. It turns out the door leaf, where the shield plays the role of an ordinary panel,
- installation of invoice strapping. It is mounted on the door leaf around the perimeter (sometimes on both sides). This option is suitable for craftsmen who do not have equipment for making a groove or tenon.
Traditional bath doors do not have trim. It requires the use of special tools. In addition, the style itself requires some simplicity, deliberate primitiveness of the manufacture of paintings. However, if the style of the room requires it, it is possible to assemble completely modern forms of doors.

Decor
Decorative decorations of the bath door are not popular, but sometimes they are found most often, special forged hinges are used. Also set the door handles of the original form. Some masters cover the canvas with lining, using a special installation technique in a checkerboard or diagonal order. There are many options, you can use ready-made solutions or come up with your own design options. The main thing is that they do not interfere with the main functionality of the door.

Useful Tips
The very first advice of experienced craftsmen is not to tackle too complex projects or door designs. If there is no self-confidence, lack of experience, it is better to choose a simpler and more reliable version of the door design.
Do not work with unprepared material. This applies to wood. Fresh pine can dry out and reduce lateral size by 10%. This means that slots up to 1 cm wide may appear in the door, which is unacceptable. It is necessary to dry and withstand quality boards.
During operation, safety precautions should be observed. Power tools are dangerous, especially when working with wood. It is necessary to use personal protective equipment, glasses, sleeves should not hang down. Gloves should not be used, especially when performing machine tools (for example, when cutting wood on a circular). Hands can slip, which often leads to injuries.
It is necessary to work with a sharp, well-threaded tool. High quality processing cannot be obtained using unprepared tooling. It is recommended to have emery on hand so that you can sharpen the cutting edges at any time.
Bath doors and x varieties
In any bathhouse there are several rooms that perform various functions, therefore, to protect everyone, you will need your own door. There should be at least two doors in the sauna room: the entrance and from the steam room to a special relaxation room.
There are three types of bath doors:
wooden doors. This is a wooden canvas, which consists of tongue-and-groove boards, which are upholstered in a conventional clapboard. These doors are usually made with one frame, but some can do with two frames. The latter are a little more complicated to manufacture, although they have excellent thermal insulation properties,
glass doors. These doors are often installed in the sauna. But now many prefer the aesthetic interior to the detriment of practicality and buy a glass door,
combined bath doors. For those people who are able to determine what is better - glass or wood, their special combination will be optimal. The bottom and the frame of such doors are made of wood, and the entire upper part is a special glass insert.
Bath Door Size
When making bath doors, all sizes are determined according to the principle of the greatest heat storage at the moment of closing and opening the doors. In this regard, all bath doors have a smaller size when compared with ordinary ones. The required height of the bath doors is 165–185 cm from the floor itself, and the width is 65–70 cm. It is worth paying attention to the threshold, the height of which should be more than 15 cm. Nevertheless, these small door sizes are used exclusively for steam rooms.
Materials for the proper manufacture of bath doors
For bath doors, you can use glass , and wood . Glass must withstand very high temperatures. However, the best material for bath doors is still wood.
Here, as a rule, apply - linden tree , larch , aspen , oak .
Hardware
Accessories for bath doors should be made of materials with very low thermal conductivity, as well as resistance to high humidity. If you apply, for example, heck and handles made of metal, then from a touch you can easily get a burn. In this regard, the accessories are usually made of wood.
This is true for heck and handles, but it is advisable to take brass hinges, but if you could not find such, then the metal hinges must be painted with a special paint against corrosion. Since the bath doors open precisely outward, the possibility of getting a burn is almost impossible.
Production of bath doors
After determining the type of door, it is already possible to start special work on the creation. For beginners, this process may seem quite complicated, but it is only a matter of experience. If you have never made doors, then for starters you can buy cheap boards and practice them at will. Further, this will allow you to make bath doors without problems.
Since the door made of wood is considered to be the most optimal door for a bath, then it’s on its example that we will consider the whole process of creating bath doors. Before making the doors to the bath, as a rule, you need to make purchases. From the materials here you can not do without:
- grooved floorboard (width is 50 mm, thickness is 30 mm),
- special pins and screws,
- lining (dimensions - 12x96 mm),
- loop (three pieces),
- timber for strapping (dimensions - 60x80 mm).
From the tool here you can not do without:
- hand circular saw,
- hammer and mallet,
- milling cutter with a set of milling cutters,
- screwdriver
- clamps
- level, vernier caliper, depth gauge, tape measure.
Making the door leaf
Making a door should always begin with the formation of the canvas. To do this, do this:
- It is necessary to take special grooved boards and cut them to the required length.
- Then, one of the boards needs to cut the spike, after that the surface on both sides of each board is jointed, you need to get an absolutely flat surface. As a rule, it is enough to remove 2 mm to achieve the desired result. Ideally, smooth boards should be 26 mm thick.
- You can begin to assemble the door leaf. First, you should make a rough assembly, insert the spike of the board into the groove of the other, while they must be connected as tightly as possible. As a result, you can get a canvas a little larger in width than necessary. This is not scary. To get the canvas of the required width, it will be necessary to cut off a little from the last and first boards.
- Measuring the desired size, smaller by 60-70 mm from the width of the entire door, and marking it on the canvas, you need to remove the last and first boards. On the circular saw, everything superfluous is cut off from them. It is important not to cut off the side on which the groove is located on the last board, but on the first board the side where the tenon is located.
- Next, the boards are collected in one canvas. To do this, on the surface of the workbench, you need to lay out the boards and insert the spike of one board into the special groove of the previous one, having previously coated the groove inside with ordinary PVA glue. For a good connection, you should knock down each board with a mallet.
- The canvas is left to dry for two to three days. So that during the drying period the canvas does not lead at all, it must be securely fixed on the workbench. To do this, fix two planks of wood on a workbench, between which the door leaf is placed longitudinally. For normal fixation, drive wooden wedges between the door leaf and the bar. A special sheet of chipboard is laid on top of the canvas and pressed with its clamps to the table.
- After drying, check the sheet for minor defects. The cracks are sealed with a special mixture of sawdust and glue, and all the irregularities are smoothed out with an ordinary plane.
We make fittings and door trim
While the canvas dries up, you can create bolts and handles, as well as a special door trim:
Bars purchased in advance for tying need to be cut to the desired length. The vertical bars must be cut according to the height of the door. Those bars that will be placed above and below the door should be slightly smaller. For example, the height of the door is 150 cm, in which case the length of the truss bars must be 150 cm. If the door width is almost 60 cm, then the length of the truss bars must be about 53 cm.
- In the previously obtained blanks of the bars, you need to choose a groove. To do this, you must first select a deep and narrow groove with the end mill and milling cutter. Its width is approximately 26 mm, its depth is 25 mm. After that, a wide, but shallow groove should be selected on top of it (depth is 10 mm and width is 50 mm). A similar stepped groove in the harness is needed for the canvas, which was lined with lining. The lining should fit into the wide one, and all grooved boards will enter the deep one.
- On the horizontal bars of the strapping, a step spike is made by means of a mill, which corresponds to the groove. At the end, you need to assemble the strapping box and check the correctness of the angles with a square. If necessary, you should grind the groove with a mill to get absolutely right angles.
- To produce deadbolts and handles, it is necessary to use trimmed boards and bars or pre-purchased blanks.
Steam room door feature
The procedure for its manufacture in general terms is the same as the wooden counterpart for entry. But there are a number of points that must be taken into account.
- The canvas should close the opening as tightly as possible so that steam does not leave the room.
- The lane is low, with a maximum of 50 mm.
- Opening out. Otherwise, the hinges (even the highest quality) of the bath door will quickly rust.
- If the bathhouse is heated "in white", then one leaf will suffice, and "in black" - necessarily two.

Wood species selection
It is better to refuse coniferous wood. Although it is less susceptible to decay, it contains tar. So, their fumes can not be avoided. But because the door to the steam room with their own hands from pine, ate is not the best solution. What is recommended?
Aspen, oak, alder. But experts advise using mainly linden or larch. The first is interesting in that, when the temperature rises, it releases substances that have a beneficial effect on the body. However, in terms of durability, it is clearly inferior to larch, this tree becomes stronger when wet, therefore it can stand at the entrance to the bathhouse or steam room for years.

Selection of lumber in size (cm)
For a canvas from an array:
- Crossbars: bar 6 x 6 (8).
- Shutter: grooved board, for the bath the optimum thickness is 2.5 - 5. The width is chosen so that it is not necessary to engage in cutting samples along the length, depending on the dimensions of the opening.
For precast fabric:
- Box and harness: timber 6 x 4 (6).
- Sash: board 12 x 3,5.
- Covering: wooden lining, thickness 1,2.

Wood processing
- This mainly applies to hardwood: impregnation with antiseptics is required. Otherwise, in a bathhouse, a wooden door will not last long. Appropriate preparations are sufficient, but when choosing, it is necessary to familiarize themselves with their component composition. The product used should not emit toxic compounds at high temperatures.
- All wooden parts are carefully sanded (by machine or manually).

Opening measurements
Before you determine the required dimensions of the block, you need to perform a number of measures:
- clean the opening. This will facilitate the process of making the door to the bathhouse with your own hands, since the dimensions will be taken as accurately as possible, and you won’t have to do the fitting,
- check the geometry, if necessary, align the opening.
- Height measurement is carried out in two places, along the edges of the passage in the wall, width - at several levels.
- If the bath is made of wood, then the door without a door is not put. Therefore, its dimensions are taken into account. This is a separate topic and should be studied if necessary.

During the construction process, some miscalculations may be made. Therefore, the opening may be slightly wider (higher) than required. You need to know that there are certain sizes of bath doors. They are smaller than similar structures installed at the entrance or inside residential buildings. This is due precisely to the need to reduce heat loss.
If the front door to the bathhouse may not correspond to the recommended dimensions, then for a pair, the size of the sash matters. What to focus on (in cm)?
- Width: between 65 - 75.
- Height: 165 ± 5. This is the total value, since the thresholds must also be taken into account (15 - 20).
From array
It is difficult to make the door to the bathhouse using this technique without experience in carpentry. This is primarily due to the curly selection of wood, the accuracy of marking the canvas. The procedure clearly illustrates the above diagram.

- Sash elements cut from the board are laid out on an even, “rigid” base and adjusted to each other.
- Marking out the installation sites of dowels for connecting parts and strengthening the bath door.
- Arrangement of grooves.
- The manufacture of crossbars and jibs (if provided).
- Assembly of the canvas.
On a note! Such a door for a bath is notable for its significant weight, so the box must be installed quite massive. Accordingly, and pick up powerful awnings.
Frame construction
- Before knocking it together, you need to clarify the dimensions. In the conditions of a bath, even the most dense and high-quality dried wood will gradually absorb moisture. Consequently, it will swell over time. And therefore, the dimensions of the frame are chosen slightly less than the opening with a pigtail. The recommended gap between them around the perimeter of 5 mm.
- Since the door to the steam room will have to be insulated, then it is made by the team, you will need 2 identical frames in terms of parameters.
- All connections are easier to make "overlap" with additional reinforcement of the door with wooden spikes. As an option - metal corners.

Door insulation
The beam used for the manufacture of frames has a certain thickness, the recommended value is indicated above. It remains only in one half of the frame to lay the insulation. Which one? With all the advantages of mineral wool, it is hygroscopic, and the steam room in the bathhouse is a room with excess humidity. Therefore, not an option. It is advisable to use sheet polystyrene foam. It is not difficult to cut and lay it, as well as to seal the gaps between it and the frame.
Door assembly
- The second half is superimposed on the insulated frame, leveled.
- Both parts of the bath door are firmly fastened (with screws).
- The gap around the perimeter of the canvas is carefully sealed. To do this, it is advisable to use a jute cord over which sealant is applied (heat-resistant categories).
It remains only to fix the hinges, to make decorative decoration of the outer part, and the bath door is ready for installation in place.
Practical tips
- The door to the steam room should open wide, for security reasons, always out.
- Given the specifics of the bath, not every hardware is suitable for fastening structural elements. Parts are selected only from steel with a corrosion-resistant coating. Otherwise, the rusting process will begin, and dark spots will appear around the locations of the fastener hats. Yes, and the screws will not last long, you will have to deal with the repair of the box and the canvas.
- Assembling the door to the steam room with your own hands, do not use metal fittings, except for canopies. Given the temperature in the room, an iron pen can cause a thermal burn, optimally a wooden one. The same applies to various decorative elements. At least from the inside, the door should not be decorated.
- With all its advantages, wood easily splits. And since it is initially dried for the door, using nails as fasteners is not the best choice. Optimal - self-tapping screws (wood).
- The bath door is quite massive. Therefore, at least three loops are used for its fastening.

Independent manufacture and installation of a door in a bathhouse is a process that requires an individual approach. There are many differences - in the thickness and material of the walls of the building, practical skills, financial capabilities. But if, in principle, the assembly order of the block is clear, then it is easy to make a bath door according to its own drawings, which will fit well into the wall opening and will reliably retain heat.
Preparation of material for bath doors
If the door structure needs to be installed in a strange room, then the first thing to do is to look at the front of the work, evaluate the place and dimensions of the future entrance to the room, measure the thickness of the walls. And most importantly, before making a door to the bathhouse, it is extremely important to check the quality of the material from which it is planned to assemble the door leaf and box. Timber and boards are almost always curved, but worst of all, if there are already cracks or chips on the surface, you need to get rid of such a tree.
The boards prepared by the customer before the start of work are subjected to additional processing:
- Cut the ends on a circular, with a manual milling cutter or any other tool so that the side surface of the boards is perfectly flat, and the folded door leaf does not even have micro cracks,
- Boards are calibrated and selected by thickness. If there is a supply of material, it is best to choose the required number of defect-free boards and fit the jointer in one size,
- Additionally dried under a canopy to avoid shrinkage after assembly of the door leaf.


For example, the thickness of a standard board – forty after finishing is reduced to 35 mm, the width of the material becomes less by 10 mm due to the alignment of the plane. As a result, it turns out that in order to make wooden doors to a bathhouse measuring 180x80 cm, you will need at least five boards, 160 mm wide, without taking into account the dimensions of the door frame.
Dimensions and assembly technology of the door for the bath
Typically, the size of the door to the bathhouse with a box, or rather, the future opening in the wall for installing the loot, is determined by the number of whole boards laid in the door leaf. To do this, take the width of the processed board, multiply by five, and adjust to the more or less acceptable dimensions of the bath door. Next, 2x35 mm is added to the desired width - the thickness of the two sides of the door foot plus the mounting gap of 10 mm. Similarly, consider the height of the door for the bath, and for the lower edge you will need to add another 5 mm to the shrink.
In addition, you need to take into account the features of the assembly technology of the entrance doors for the bath. The door leaf for entering the bath can be assembled in two ways:
- Cut a spike and a groove at the ends of the standard forty, as is done for a grooved board. In this case, the total width of the canvas will decrease by 10x5 = 50 mm,
- Mill a groove with a depth of 15 mm at the ends of the prepared and stripped wooden billets; the joining of two boards is carried out on an insert-key. In this case, the width of the doors and the dimensions of the opening in the wall of the bath do not need to be adjusted.

There are two ways to make doors for the bath, there is not much difference, although the doors on the keys are more flexible and durable. The question of technology, how to make a door to the bath, depends on the wishes of the customer and the availability of woodworking equipment.

Firstly, the key doors for the bath are considered a classic manufacturing option, and secondly, in case of accidental marriage, you can always replace the key and remake the joint.

Tools for building the front door to the bath
It is very important, before you make the door to the bathhouse with your own hands, to really assess your capabilities, namely, the availability of tools and devices for work.
If you have at least an initial carpentry experience, in order to assemble the front door to the bathhouse with your own hands, you will need a minimum set of tools:
- Manual electric milling cutter with a set of end milling and passage mills,
- A long metal ruler, you can take a two-meter plaster rule or any aluminum strip with a length of at least 200 cm, quite flat and strong,
- Construction level and mason plumb,
- Belt sander or vibrator,
- Joiner chisel, wooden or metal tamping hammer,
- Set of carpentry clamps for clamping boards, thickness 20-60 mm,
- Joiner glue, you can use PVA-M, one door for a bath will take at least 7-10 liters, linen or jute tow.
In addition, to install the door in the bathhouse with your own hands, you will need to make cuts in the wall, so you will need to rent an electric or gasoline chainsaw for at least one day.
Grooving and keying
First of all, on the end surface of the boards, it is necessary to cut out the groove for the installation of the connecting key. The two most durable and beautiful boards, from those selected and prepared for work, are put aside in advance, in these details the groove will be cut only on one side. These parts will go to the left and right sides of the door leaf.

Milling a groove is performed in the following sequence:
- The board is fixed in a horizontal position using clamps on a carpentry bench. A milling line is drawn at the end with a ruler and a pencil,
- Along the marking line, a metal ruler or rule is rigidly fixed. This will help to make the groove and, ultimately, the door leaf of the bathhouse as flat and even as possible,
- Groove cutting is performed with an end mill with a diameter of at least 10 mm, too large a width will weaken the canvas, a small cut will not hold the board, and the whole structure can sag in the doorway of the bath.

The next step is to produce mounting dowels; five rails are required to assemble the web. Fixing material can be cut from the remains of the prepared board for the bath or buy ready.

The key-rail should go into the grooves of adjacent boards with a slight tightness, so that it is easier to insert it into the groove, small chamfers are removed on the edges with sandpaper.
Door leaf assembly
The next step in the manufacture of the door for the bath is the assembly of the door leaf. Initially, the boards are joined on the keys “dry”, without any gluing of joints. The assembled door is laid out on a workbench and knocked out with a wooden hammer to completely seat the keys in the grooves.
Dry assembly is required to ensure that all parts of the bath door are correctly fitted. In addition, the protruding ends of the boards and dowels are trimmed along the upper and lower edges of the blade.

If there are no problems, each joint is taken apart, smeared with glue and knocked back. The glued door of the bath is laid on a workbench and fixed with clamps until the glue joints are completely dry. Until the glue has hardened, excess glue mass is carefully removed at the joints. This must be done immediately, otherwise in a day the door surface will be covered with unremovable dark spots of adhesive film.
Stuff the horizontal crossbars on the door
The next day, after the final setting of the glue, it is necessary to make horizontal crossbars. In fact, these are two thick wooden blocks laid on the bath door horizontally or under a slight slope.
Crossbars perform two functions:
- Pull the web horizontally
- Transfer the load from the weight of the structure to the canopies and the door frame at the entrance to the bathhouse.
Hinges for doors to the bathhouse are also placed on the cross members, which allows you to unload the door leaf and transfer most of the weight directly to the loot.

The device and method of fastening the cross members of the bath doors significantly differ from similar parts in conventional doorways used in barns, garages, warehouses, summer kitchens. Horizontal bars are installed on the door of the bathhouse, without any fasteners, and the connection is ensured by the dovetail lock profile.
The sides of each bar are cut off using an electric cutter so that an isosceles trapezoid is formed in the cross-section of the cross. The same cutter cuts out the grooves on the door leaf of the bath.

So that the door does not move in the horizontal direction, the grooves of each lock in the door leaf are cut out not strictly horizontally, but with their own slight bias. After adjusting the sizes, the bars are locked, glued and fixed with clamps until completely dry.
The finished, dried assembly must be sanded with an electric grinder, this will remove burrs and make the outer surface as flat and smooth as possible. If there is a need for additional decoration, the door to the bath can always be painted or covered with a film.
Features of making do-it-yourself doors for the bath are shown in the video
Making loot and installing it at the entrance to the bath
After mounting the crossbars, the actual dimensions of the doors to the bathhouse become known. You can cut the opening at the entrance to the bath, but first you need to make a door frame.
For the manufacture of loot the same board is used as a magpie as for the door to the bathhouse. For the vertical sides of the groove, two boards are cut out 200 mm wide and 60 mm longer than the door leaf. Two short horizontal boards are cut in the same way for the door frame and the upper crossbar. We lay out the cut segments around the perimeter of the assembled door leaf and temporarily sew at the corners with the remnants of the rail and upholstery nails.
Since the bath door should only swing open outward, the canvas will need to be drowned in a loot from the entrance side. To do this, mark along the contour of the inner surface of the box a strip 10 mm deep, which will need to be cut with a milling cutter or any other available tool.
Further, from the outside of the side racks of the door frame, you will need to cut a groove with which the lute will be held in the doorway of the wooden bath. We connect all parts of the door frame using self-tapping screws. The side racks should be adjacent to the ends of the door leaf with a gap of 1.2-2 mm, in the region of a nut, the gap is increased to 5 mm. We strengthen the box at the corners with temporary slats with spacers, as soon as the loot is in the doorway of the bath, the planks will be removed.
We put the box and hang the door leaf
First of all, it is necessary to measure the outer dimensions of the box, according to them you will have to mark the contour of the cut of the doorway at the entrance to the bathhouse. This should be done only by a practical measurement, and not by a calculation method, otherwise there is a chance of making the cut in the wall of the bath too large.
The opening for the box should be less than the width of the finished canvas by 6-7 cm. When cutting in the wall of the bath, it is also worth considering the width of the cut. Initially mark the height of the threshold in the bath, then measure the height of the box, conduct axial and lay the width of the loot. With the help of a building plumb line, markings are made on the wall of the bathhouse under the cut line.
After the opening for installation of the box and the future door was cut out in the bathhouse, it is necessary to cut a vertical line of the tenon on the wall with a milling cutter or manually - with a hammer and a chisel. The width and height of the spike should fully correspond to the dimensions of the groove cut on the sides of the groove.
The assembly of the box follows. The threshold is set first, then the side posts are packed onto the spikes, and the upper cross member is attached last. In the upper ceiling part of the box, between the wall and the cross-member, there should be free space 5-7 mm high, which is clogged with linen or jute fiber and will be covered by platbands in the future. The gap must be maintained to compensate for the precipitation of the bath. If the construction of the bath is made of brick, the gap is simply blown with foam.

Before knocking down the details of the box, you need to put the finished door leaf in it and align the entire structure horizontally and relative to the facade of the bathhouse, wooden wedges.
Hinges for bath doors
At the last stage of arranging the entrance, a door leaf is weighed. Before installing the hinges for the doors in the bath, the door leaf is slightly raised in the box using two small wooden wedges. The easiest way to install the door canopies, they are completely located on the outside of the canvas. The short part is attached to the bottom, the counterpart is sewn onto the crossbars.
If, according to the design of the facade of the bath, it is necessary to completely hide the elements of the awnings, then screw loops can be used.
If the entrance to the bathhouse is well insulated from the dressing room and the steam room, then the doors can also be hung on standard butterfly hinges. The main advantage of such canopies is high strength and reliability, for hanging the heaviest door in the bath one pair is enough.

To attach the loops you will need
- Mark the contours of the fastening on the groove and at the end of the canvas,
- Cut the chisel grooves on both parts and secure the awnings with ordinary screws.
It remains to hang the canvas on the counterpart of the loop and adjust the clip so that the door to the bathhouse closes without touching the loot. After installing platbands, seals, handles and locks, the door to the bathhouse is considered ready.